
Membrane switch technology made it possible for companies to develop more convenient gadgets. Washing Machines, Microwaves, Television and various other devices work on the same technology. Compared to mechanical switches Membrane switches offer a softer feel. As the switch is more sensitive, users can easily change functions or shift switches. You can change operations and complete tasks without exerting much effort. The switch is also leak-proof and waterproof. This makes the technology ideal for businesses operating with harmful components in harsh environments.
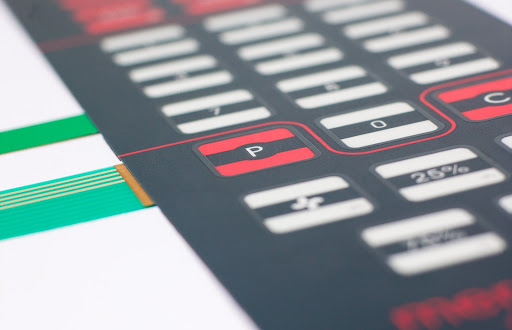
Membrane switches are touch-sensitive devices developed by the printing, cutting and laminating of precision thin-film plastic materials. Low-voltage, low-current momentary electrical contact is made and retained by applying finger-tip force to the front surface of the switch. Membrane switches are primarily used with microprocessor-based control systems found in communication, medical, instrumentation and appliance products.
A number of industries now prefer Membrane switches technology for front panel solutions where frequent contact with water is an issue due to its sealed nature coupled with its reliability and ability to offer tremendous aesthetic flexibility. The technology although sophisticated is very simple to create at home and renders fairly effective. Let’s have a look at how to create membrane switches from the scratch
Step 1: Understanding the Keypad
The first thing to understand is how this keypad works. A matrix style keypad is a grid consisting of rows and columns and each button corresponds to a certain row and column. A 9 button keypad, will use 3 rows and 3 columns. The first button connects the link between Row 1 and Column 1 (R1C1) just like in battleship. 2 would be R1C2, 3 R1C3, and 8 would be R3C2. The main reason to do this is instead of having 9 different buttons to wire up, you would only need to wire up 3 columns and 3 rows for significantly fewer wires. This is very beneficial when you begin adding buttons. Adding one more row and column (2 wires) will add 7 buttons.
Step 2: Collecting Materials.
The best thing about this instructable is you probably already have all the things you need to build this in your house. This is a cheap, simple, and effective way of making a membrane keypad. You will need:
- Aluminum Foil *foil tape works too.
- Some sort of paper or flat material (what you choose here will affect the durability.)
- Glue (unless you’re using foil tape)
- And a spacer of some sort (a few layers of paper with holes cut in them may work I’m using double-sided sticky foam pads)
Step 3: Decision Time
Before everything else you have to decide what you want your keyboard to look like/how many buttons do you want on it. For this instructable, you can use a 3X3 setup with the numbers from 1 to 9 on it. Once you have finalized the look, draw it and decide where you want all the wires to go. Make a mock-up on your computer using any design software you like for e.g. Paint, Photoshop, and Illustrator and proceed to the next step.
Step 4: Mapping Out Your Cheap “Circuit”
We are going to be glueing on foil to make a flexible, cheap, however effective circuit board. What we need to do now is on our computer mockup we need to make how our columns and rows are going to be set-up. If you are using Photoshop make 2 new layers, one called rows the other columns. If you’re just using paint make a copy of the file called rows and another column.
We will put large black lines on these new layers, where we want our “Circuits” to go.
Now you need to flip one of your images vertically. Go ahead and print these out for the next step.
Step 5: Faux Circuit Making Time
Now that you have your printed templates you can start making your circuit. This is when you glue your foil where your rows and columns are supposed to go.
*NOTE* At this point it’s a good idea to re-make your front design to include labels for the hookup at the end of the leads with the labels. R1, R2, R3, C3, C2, C1. This is just going to make it easier for you.
Step 6: Final Assembly
In the next step, we will be putting it all together. Take your spacers and apply them to one side of your keypad. You could use silicone technically, the type used for caulking, as a really decent spacer. To apply these spacers we need to make sure that there is a hole in the centre of them so that the rows and columns can contact one another when they are depressed. You could use a hole-punch to get better results. The spacers make sure that other parts of our circuit do not come in contact with each-other incidentally.
Once your spacers have been applied, you may need to glue whatever you are using and put the other side of your keypad on top of this one. You have already made sure that everything was mapped out precisely on your template you designed on your computer.
Optional Step
To help your keypad enjoy a long healthy life, laminate it. It helps to provide structural support for the paper. Constant pressing can and will create depressions in the paper that sooner or later will cause your keypad to become ineffectively pressurize that button constantly.
Recent Comments